INKNXUNI001I200 – Universal IR gateway to KNX TP with temperature and humidity sensor
INKNXUNI001I200 is Universal IR gateway to KNX TP for air conditioners, with temperature and humidity sensor, 2 binary inputs, ETS configuration.


- Stock: 5-7 days
- Brand: Intesis
- Model: INKNXUNI001I200
Full design package: User manual, CE declaration, CAD, PDF, certificates and test reports
If you're preparing technical documentation or an installation design, you can receive a complete set of design materials for this model. This is a quick way to gather the required documents for audits, acceptance, or project documentation.
- Device User Manual
- CE Declaration of Conformity (EU Declaration of Conformity)
- Mechanical Drawings – CAD (STEP/DWG) or high-quality PDF
- Additional Certificates and Test Reports (if available for the model)
Universal IR gateway to KNX TP for air conditioners, with temperature and humidity sensor, 2 binary inputs, bus powered from KNX, ETS configuration.
INKNXUNI001I200 – integration scope and how the IR ↔ KNX TP logic behaves in real sites
INKNXUNI001I200 is built to control one AC indoor unit per gateway. This matters in multi-room projects: if you need independent control per room, plan one gateway per indoor unit to keep group addresses, feedback objects, and scenes clean. The bidirectional behavior is practical in two ways:- commands from KNX are translated into IR frames sent by the gateway’s IR emitter to the AC indoor unit,
- IR commands from the handheld remote can be “seen” by the gateway so KNX can stay consistent with what the user did locally (no “UI shows ON but unit is OFF” drift).
For commissioning, treat IR learning and ETS download as two different steps: ETS handles KNX-side parameters/objects, while DCA loads the IR remote profile that actually makes the indoor unit respond.
The INKNXUNI001I200 by Intesis is a universal KNX TP gateway designed to integrate any air conditioner equipped with an infrared (IR) remote control into KNX building automation systems. It provides bidirectional communication between the AC indoor unit and the KNX network, enabling full control and monitoring of HVAC functions such as On/Off, operating mode, fan speed, temperature setpoint, and louver position.
INKNXUNI001I200 – Autolearn is time-critical and should end with “Download IR configuration”
Autolearn is not a generic “IR scan” – it’s the process of matching the remote control to an RCF profile. When you click Autolearn in DCA, follow the emergent steps and keep the timing strict:- Steps a–c must be completed within 60 seconds.
- After clicking Learn, the gateway LED turns steady white.
- Point the AC IR remote at the gateway and press the ON/OFF button; once the pulse is received, the LED turns off.
At that point, DCA should show results in Received pulse and Accepted RCFs. Select one RCF_n, click Save, then run Autoconfigure (to set AC UNIT FEATURES based on the RCF), and finally click Download in Download IR configuration. This last step is critical: it downloads only the IR configuration to the gateway, and you still must use ETS to download the application program and the individual address as usual.
The gateway is compatible with virtually any IR-controlled air conditioner thanks to its Autolearn function, which automatically recognizes IR codes from the AC remote controller. Configuration is performed via ETS (Engineering Tool Software) using the DCA – Device Configuration App, ensuring quick commissioning and reliable operation. The built-in temperature and humidity sensor allows real-time measurement and transmission of ambient values to KNX, enabling precise climate control and automation scenarios.
INKNXUNI001I200 – USB vs KNX connection during DCA commissioning
You can connect DCA using KNX, but for IR commissioning and downloads the recommended method is USB because it is significantly faster. Typical workflow:- Connect via USB, select the correct USB Port, and click Connect.
- Run Autolearn → select RCF → Save → Autoconfigure → Download IR configuration.
- Only after the IR profile is in place, proceed with ETS to download the KNX application and the individual address.
This avoids the most common field failure: “ETS download completed but the AC doesn’t react” (missing IR configuration in the gateway).
The INKNXUNI001I200 includes two binary inputs for connecting external sensors such as motion detectors, window contacts, or pulse outputs (S0). With KNX Data Secure support, all communication is encrypted and fully protected from unauthorized access. The device is bus-powered from KNX (29 VDC), requiring no additional power supply. A USB Type-C port allows fast configuration and firmware updates directly from a PC.
INKNXUNI001I200 – binary inputs: JST PHR-3 pinout, cable limits, and how to prevent “contact chatter”
The gateway uses a JST PHR-3 connector for potential-free binary inputs (compatible with S0 pulse counter type). Pinout (left to right) and factory wiring:- Pin 1: Ground – Black, 0.2 mm² / 24 AWG
- Pin 2: Binary input 2 – White
- Pin 3: Binary input 1 – White
Factory wires are 12 cm long and can be extended up to 30 m. For occupancy sensors and window contacts, the gateway reacts only to the contact being opened or closed. If your sensor supports it, set a delay time (debounce) to prevent rapid toggling (continuous contact changes in a very short period), which can otherwise spam KNX logic and scenes.
The gateway supports the Parrot Mode, helping installers optimize its placement relative to the air-conditioning unit for best IR signal coverage. Up to 10 KNX scenes can be stored and activated (e.g., comfort, night, or energy-saving modes). Its compact and modern design makes it ideal for residential, hospitality, and office applications. The interface is fully KNX certified and developed for HVAC integrators requiring a flexible and manufacturer-independent solution.
INKNXUNI001I200 – Parrot Mode: the fastest way to validate IR placement before fixing the device
Parrot Mode turns the gateway into an IR repeater that continuously reemits a previously emitted remote-control signal. If you point the AC IR remote at the gateway and press On/Off, that signal will be reemitted by the gateway every second until it exits Parrot Mode. Practical emplacement procedure:- Enable Parrot Mode, then send On/Off to the gateway using the AC remote.
- Place the gateway in the chosen location and verify the indoor unit reliably receives the command.
- Exit Parrot Mode and proceed with final mounting.
Good practice is to keep the gateway within 5 m of the indoor unit and avoid blocked line-of-sight. Use Parrot Mode whenever the room layout (curtains, glass partitions, reflective surfaces) makes IR behavior uncertain.
INKNXUNI001I200 – LED patterns and “quick triage” in the field
The multicolor LED helps you separate IR issues from KNX issues fast:- Regular operation (steady colors): Orange = Heat, Blue = Cool, Blue = Dry, Yellow = Auto, Green = Fan.
- Command received/sent: LED blinks x3 in the color corresponding to the active mode.
- Error notification: Orange blink indicates a communication error.
- Autolearn window: steady white means “ready to learn” (after pressing Learn), then LED turns off once a pulse is received.
If you see communication error blinking, verify the KNX side first (programming state, group address mapping, secure certificate if used). If KNX is fine but the unit doesn’t react, re-check IR: Parrot Mode placement test and whether the correct RCF was saved and downloaded.
INKNXUNI001I200 – push button functions: KNX programming, manual control, Parrot Mode, factory reset
The push button supports short and long press logic:- Short press: less than 2 seconds
- Consecutive short presses: time between presses must be less than 0.5 seconds
- Long press: hold for 5 seconds
Functions linked to the push button:- KNX programming mode: enter/exit with 1x short press
- Manual control mode: enter/exit with long press (5 s)
- Parrot Mode: enable/disable with 3x short press (note: in Parrot Mode, the AC unit cannot be turned On/Off using this button)
Manual control mode actions (useful for first power-up tests without KNX):- Indoor unit OFF: 1x short press → turns ON in Cool at 25°C
- Indoor unit OFF: 2x short press → turns ON in Heat at 21°C
- Indoor unit ON: 1x or 2x short press → turns OFF
Factory reset procedure:- Disconnect the gateway from power.
- Press and hold the push button.
- Reconnect power.
- After 10 seconds, the LED flashes five times in white.
- Release the button.
INKNXUNI001I200 – mounting detail that prevents misalignment and service calls
For wall mounting, the rear panel has a blind hole for mounting. Use an M4 screw and let the screw head protrude about 2 mm from the wall before placing the gateway. Avoid opening the enclosure; if it has been opened, ensure it is closed correctly. Two practical indicators of incorrect closing are:- the push button does not protrude properly and gets stuck inside the lid (will cause malfunction),
- the LED blinks in white.
Main features- Integration of any IR-controlled air conditioner with the KNX TP system.
- Built-in temperature and humidity sensor for local measurement.
- Two binary inputs for motion sensors, window contacts, or pulse counters (S0).
- Configuration through ETS software with DCA app.
- Support for KNX Data Secure – encrypted communication.
- Autolearn function for automatic recognition of IR codes.
- Parrot Mode for optimizing IR signal location.
- Storage and activation of up to 10 KNX scenes.
- Bus powered from KNX 29 VDC – no external power needed.
- USB Type-C port for setup and firmware update.
Technical specifications
Interfaces and connections- KNX: 1 × KNX TP (red/grey terminal), 29 VDC, 17 mA.
- Binary inputs: 2 × potential-free (JST PHR-3), 12 cm wire, extendable up to 30 m.
- USB port: 1 × USB Type-C (USB 2.0) – configuration and firmware update.
Sensors- Temperature: 0…+60 °C (accuracy ±5 °C).
- Humidity: 5–100% RH (accuracy ±10%).
Indicators and buttons- Multicolor LED indicator – power, communication, and error states.
- Function button – KNX programming mode, factory reset, and manual control.
Enclosure and mounting- Material: PC UL94 V-0, light grey (NCS S1002-B).
- Dimensions: 93 × 60 × 21 mm.
- Weight: 80 g.
- Mounting: wall or flat-surface mounting (e.g., desk).
- IP rating: IP20 (IEC 60529).
Environmental conditions- Operating temperature: 0…+60 °C.
- Humidity: 5–95% (non-condensing).
- Port isolation: 1000 VDC.
Certifications- KNX certified
- CE, RoHS compliant
- Supports KNX Data Secure communication
Example of integration
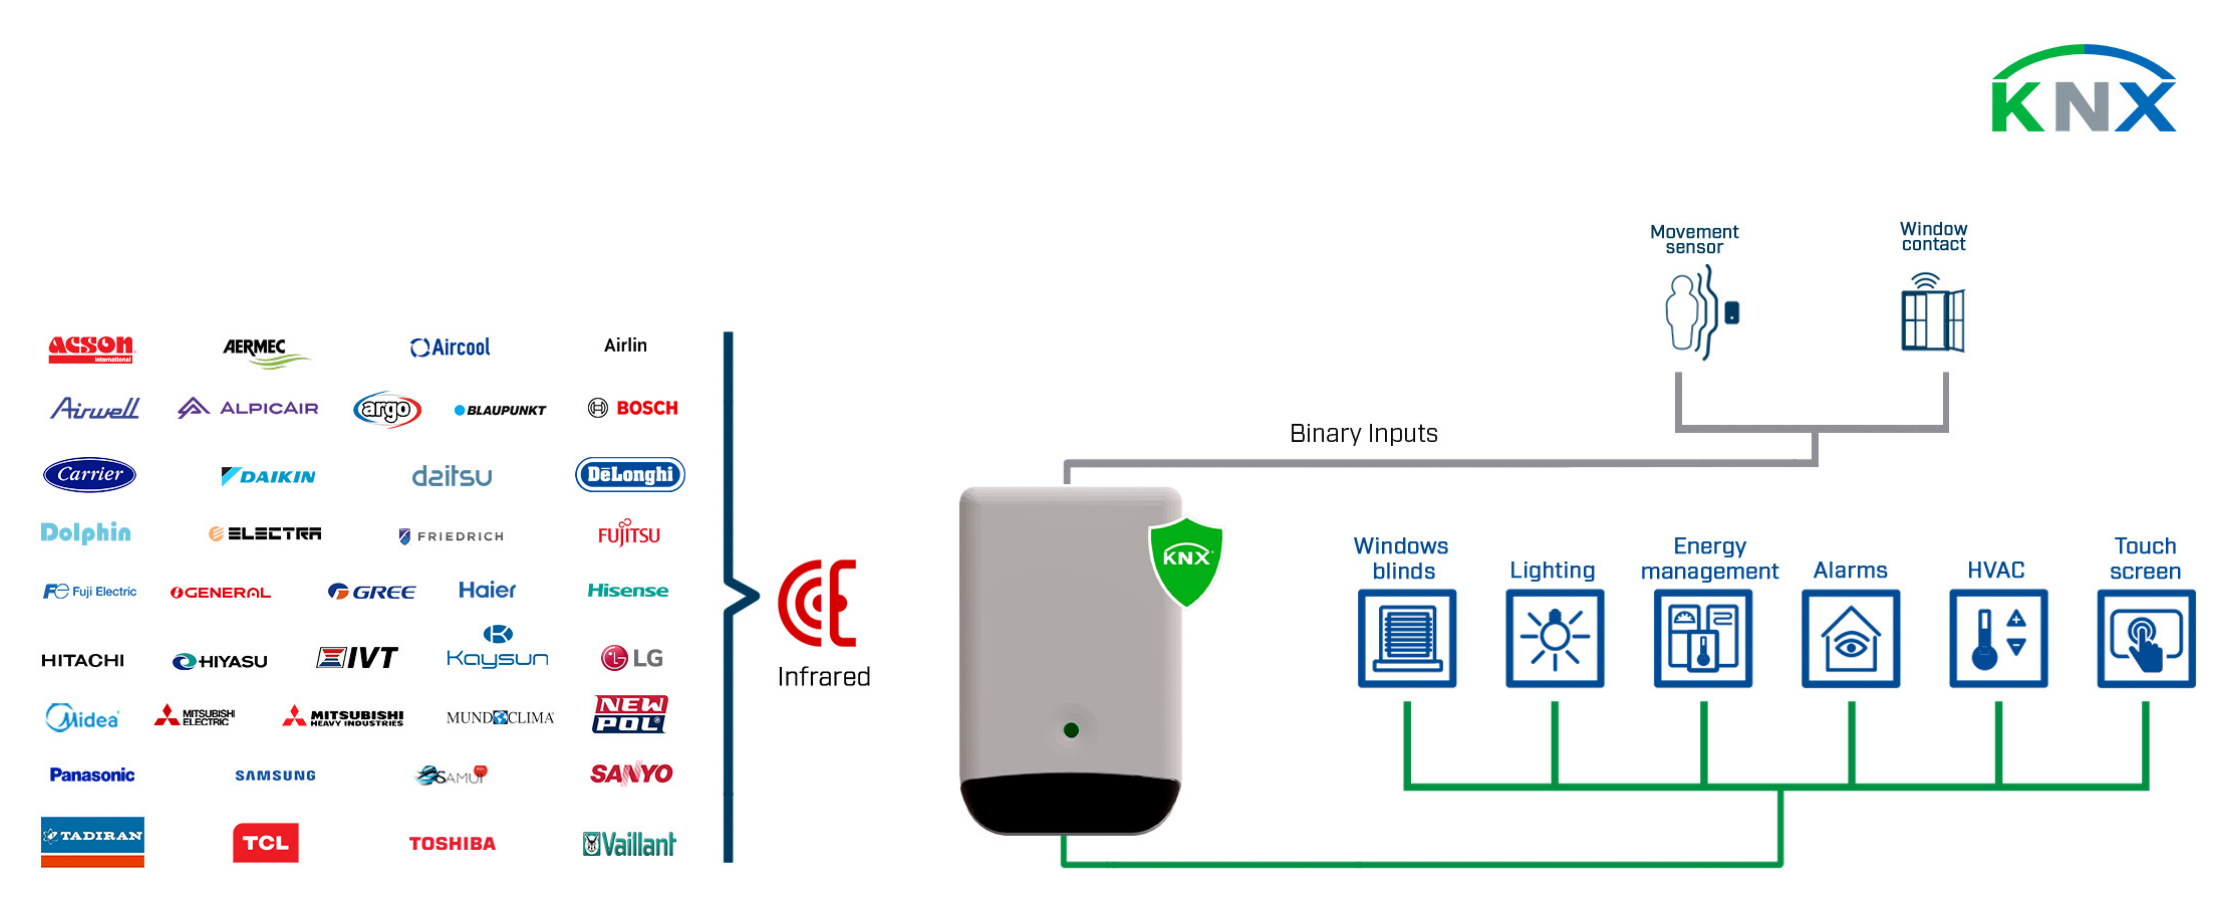
Field-proven answers for KNX/HVAC integrators: Autolearn, Download IR configuration, Parrot Mode, binary inputs, LED diagnostics, and reset.
? Autolearn in INKNXUNI001I200 shows no “Accepted RCFs” – what exact steps should I repeat? ▾
Repeat the full Autolearn sequence within the required time window. Steps a–c must be completed within 60 seconds: click Learn (LED turns steady white), point the IR remote at the gateway, and press ON/OFF. The LED should turn off once the pulse is received.
- Confirm DCA fields Received pulse and Accepted RCFs populate; if not, try again with a stable aim and distance.
- When you see entries, select one RCF_n and click Save.
- Then run Autoconfigure and click Download in Download IR configuration.
If you skip “Download IR configuration”, the gateway may look configured in DCA but still won’t control the AC reliably.
? ETS download completed, but INKNXUNI001I200 does not control the indoor unit – what is the first thing to verify? ▾
Verify that the IR profile was actually written to the gateway using DCA: Autolearn → select RCF → Save → Autoconfigure → Download IR configuration. This action downloads only the IR configuration; ETS still must download the application program and the individual address, but ETS alone will not “teach” IR codes.
? Should I use USB or KNX connection in DCA for commissioning INKNXUNI001I200? ▾
You can use KNX, but for IR configuration download it is recommended to use USB because it is significantly faster. Typical best practice is to do IR learning and IR download via USB first, then finish KNX-side programming in ETS.
? How does Parrot Mode work on INKNXUNI001I200, and what does “every second” mean in practice? ▾
In Parrot Mode the gateway acts as a repeater and continuously reemits a signal previously emitted from the IR remote control. If you press On/Off on the remote pointing at the gateway, that signal is then reemitted by the gateway every second until Parrot Mode is exited. This is ideal to validate placement: move the gateway to the intended location and confirm the indoor unit reacts consistently.
? How do I enable/disable Parrot Mode using the push button on INKNXUNI001I200? ▾
Use 3x short press to enable/disable Parrot Mode. A short press is less than 2 seconds, and the time between consecutive short presses must be less than 0.5 seconds. Note: when the gateway is in Parrot Mode, the AC unit cannot be turned On/Off using the button.
? What are the manual control actions on INKNXUNI001I200 (no ETS, no app) to quickly test the indoor unit? ▾
Enter manual control mode with a long press (5 seconds). Then use short presses to test basic HVAC behavior:
- If the indoor unit is Off: 1x short press turns it On in Cool mode at 25°C.
- If the indoor unit is Off: 2x short press turns it On in Heat mode at 21°C.
- If the indoor unit is On: 1x or 2x short press turns it Off.
This is useful to validate IR placement and responsiveness before finishing KNX group address mapping.
? How do I wire the binary inputs on INKNXUNI001I200, and what is the maximum cable extension? ▾
The binary inputs are potential-free on a JST PHR-3 connector. Pinout left-to-right: Pin 1 = Ground (black, 0.2 mm² / 24 AWG), Pin 2 = Binary input 2 (white), Pin 3 = Binary input 1 (white). Factory wires are 12 cm and can be extended up to 30 m. The gateway reacts to the sensor contact being opened/closed; if your sensor supports it, set a delay time to prevent rapid toggling.
? How do I factory reset INKNXUNI001I200, and what LED cue confirms the reset? ▾
Disconnect power, press and hold the push button, reconnect power, and after 10 seconds the LED flashes five times in white. Release the button after the five white flashes. After reset, redo IR commissioning (Autolearn → Autoconfigure → Download IR configuration) and then download the KNX application and individual address in ETS.
")
")
")
")
")

